[toc]
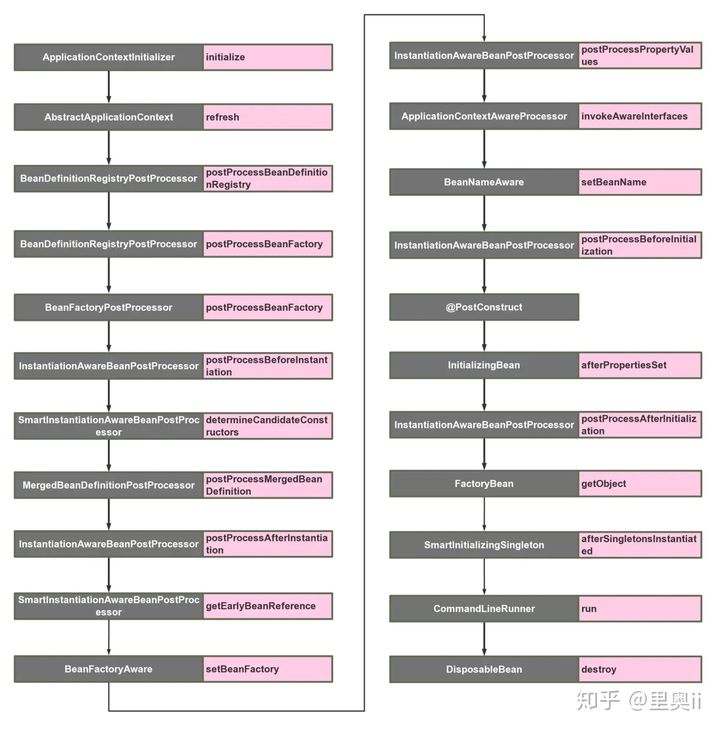
1.可扩展的接口启动调用顺序图 spring容器中Bean的生命周期内可扩展的点的调用顺序:
2.ApplicationContextInitializer
org.springframework.context.ApplicationContextInitializer
这是整个spring容器在刷新之前初始化ConfigurableApplicationContext的回调接口,简单来说,就是在容器刷新之前调用此类的initialize方法。用户可以在整个spring容器还没被初始化之前做一些事情。
比如在最开始激活一些配置,或者利用这时候class还没被类加载器加载的时机,进行动态字节码注入等操作。
扩展方式为:
1
2
3
4
5
6
public class TestApplicationContextInitializer implements ApplicationContextInitializer { @Override public void initialize (ConfigurableApplicationContext applicationContext) { System.out.println("[ApplicationContextInitializer]" ); } }
使用场景
在应用启动时进行环境配置:可以使用 ApplicationContextInitializer 来在应用上下文初始化时进行一些环境相关的配置,例如设置系统属性、加载外部配置文件等。
1
2
3
4
5
6
7
8
public class EnvironmentInitializer implements ApplicationContextInitializer <ConfigurableApplicationContext> { @Override public void initialize (ConfigurableApplicationContext applicationContext) { ConfigurableEnvironment environment = applicationContext.getEnvironment(); environment.setActiveProfiles("development" ); System.out.println("配置文件设置为development" ); } }
注册自定义的 BeanFactoryPostProcessor 或者 BeanPostProcessor:ApplicationContextInitializer 可以用来注册自定义的 BeanFactoryPostProcessor 或者 BeanPostProcessor,以便在 Bean 初始化之前或之后进行某些自定义处理。
1
2
3
4
5
6
7
8
9
public class CustomBeanFactoryPostProcessorInitializer implements ApplicationContextInitializer <ConfigurableApplicationContext> { @Override public void initialize (ConfigurableApplicationContext applicationContext) { applicationContext.addBeanFactoryPostProcessor(beanFactory -> { System.out.println("添加了自定义BeanFactory后处理器..." ); }); } }
动态地添加 PropertySource:可以在初始化过程中动态地添加 PropertySource,以便后续的 Bean 定义和初始化过程中可以使用这些属性。
1
2
3
4
5
6
7
8
public class PropertySourceInitializer implements ApplicationContextInitializer <ConfigurableApplicationContext> { @Override public void initialize (ConfigurableApplicationContext applicationContext) { MutablePropertySources propertySources = applicationContext.getEnvironment().getPropertySources(); propertySources.addFirst(new MapPropertySource ("customPropertySource" , Collections.singletonMap("customKey" , "customValue" ))); System.out.println("已添加自定义属性源" ); } }
Spring环境下添加扩展点
因为这时候spring容器还没被初始化,所以想要自己的扩展的生效,有以下三种方式:
在启动类中用springApplication.addInitializers(new TestApplicationContextInitializer())语句加入;
application配置文件配置context.initializer.classes=com.example.demo.TestApplicationContextInitializer
Spring SPI扩展,在spring.factories中加入(官方推荐)1 org.springframework.context.ApplicationContextInitializer=\com.example.demo.TestApplicationContextInitializer
3.BeanDefinitionRegistryPostProcessor
org.springframework.beans.factory.support.BeanDefinitionRegistryPostProcessor
这个接口在读取项目中的beanDefinition之后执行,提供一个补充的扩展点。
使用场景:可以在这里动态注册自己的beanDefinition,可以加载classpath之外的bean。
扩展方式为:
1
2
3
4
5
6
7
8
9
10
11
public class TestBeanDefinitionRegistryPostProcessor implements BeanDefinitionRegistryPostProcessor { @Override public void postProcessBeanDefinitionRegistry (BeanDefinitionRegistry registry) throws BeansException { System.out.println("[BeanDefinitionRegistryPostProcessor] postProcessBeanDefinitionRegistry" ); } @Override public void postProcessBeanFactory (ConfigurableListableBeanFactory beanFactory) throws BeansException { System.out.println("[BeanDefinitionRegistryPostProcessor] postProcessBeanFactory" ); } }
场景示例:
比如依赖Redis.jar,如果该依赖jar存在,则用redis当缓存,否则就用本地缓存。这个需求完全可以在postProcessBeanDefinitionRegistry中利用Class.forName判断依赖,存在的话则注册对应class到容器。
1
2
3
4
5
6
7
8
9
10
11
12
13
14
15
16
17
18
19
20
21
22
23
24
25
26
27
28
29
30
31
32
33
34
35
36
37
38
@Configuration public class AppConfig { @Bean public static BeanDefinitionRegistryPostProcessor customBeanDefinitionRegistryPostProcessor () { return new BeanDefinitionRegistryPostProcessor () { @Override public void postProcessBeanDefinitionRegistry (BeanDefinitionRegistry registry) throws BeansException { System.out.println("在 postProcessBeanDefinitionRegistry 中根据条件注册缓存实现类" ); try { Class.forName("redis.clients.jedis.Jedis" ); System.out.println("检测到 Redis 依赖,注册 RedisCacheService" ); AbstractBeanDefinition redisCacheBeanDefinition = BeanDefinitionBuilder .genericBeanDefinition(RedisCacheService.class) .getBeanDefinition(); registry.registerBeanDefinition("cacheService" , redisCacheBeanDefinition); } catch (ClassNotFoundException e) { System.out.println("未检测到 Redis 依赖,注册 LocalCacheService" ); AbstractBeanDefinition localCacheBeanDefinition = BeanDefinitionBuilder .genericBeanDefinition(LocalCacheService.class) .getBeanDefinition(); registry.registerBeanDefinition("cacheService" , localCacheBeanDefinition); } } @Override public void postProcessBeanFactory (ConfigurableListableBeanFactory beanFactory) throws BeansException { } }; } }
4.BeanFactoryPostProcessor
org.springframework.beans.factory.config.BeanFactoryPostProcessor
这个接口是beanFactory的扩展接口,调用时机在spring在读取beanDefinition信息之后,实例化bean之前。
虽然此时不能再注册beanDefinition,但是可以趁着bean没有实例化,可以修改 Spring 容器启动时修改其内部的 BeanDefinition。通过实现 BeanFactoryPostProcessor 接口,开发者可以在 Bean 实例化之前修改 Bean 的定义元数据,例如Scope、依赖查找方式、初始化方法、修改属性值、添加额外的元数据等,进而影响初始化行为。
扩展方式为:
1
2
3
4
5
6
public class TestBeanFactoryPostProcessor implements BeanFactoryPostProcessor { @Override public void postProcessBeanFactory (ConfigurableListableBeanFactory beanFactory) throws BeansException { System.out.println("[BeanFactoryPostProcessor]" ); } }
使用场景
修改 Bean 属性:可以动态地改变某些配置属性或者注入额外的依赖。
1
2
3
4
5
6
7
8
9
public class PropertyModifierBeanFactoryPostProcessor implements BeanFactoryPostProcessor { @Override public void postProcessBeanFactory(ConfigurableListableBeanFactory beanFactory) throws BeansException { BeanDefinition beanDefinition = beanFactory.getBeanDefinition("myBean"); MutablePropertyValues propertyValues = beanDefinition.getPropertyValues(); propertyValues.addPropertyValue("propertyName", "newValue"); } }
动态注册 Bean:可以根据配置文件或者系统环境变量来决定是否注册某个 Bean。
1
2
3
4
5
6
7
8
9
10
11
12
13
14
15
public class ConditionalBeanRegistrar implements BeanFactoryPostProcessor { @Override public void postProcessBeanFactory (ConfigurableListableBeanFactory beanFactory) throws BeansException { if (someCondition()) { BeanDefinitionBuilder beanDefinitionBuilder = BeanDefinitionBuilder.genericBeanDefinition(MyBean.class); beanFactory.registerBeanDefinition("myConditionalBean" , beanDefinitionBuilder.getBeanDefinition()); } } private boolean someCondition () { return true ; } }
修改 Bean 定义:可以修改 Bean 的作用域、初始化和销毁方法等定义信息。
1
2
3
4
5
6
7
8
public class ScopeModifierBeanFactoryPostProcessor implements BeanFactoryPostProcessor { @Override public void postProcessBeanFactory(ConfigurableListableBeanFactory beanFactory) throws BeansException { BeanDefinition beanDefinition = beanFactory.getBeanDefinition("myBean"); beanDefinition.setScope(BeanDefinition.SCOPE_PROTOTYPE); } }
属性占位符替换:可以使用 PropertyPlaceholderConfigurer 实现 BeanFactoryPostProcessor 接口,来替换 Bean 定义中的属性占位符。
1
2
3
4
5
6
7
8
9
public class CustomPropertyPlaceholderConfigurer extends PropertyPlaceholderConfigurer { @Override protected void processProperties (ConfigurableListableBeanFactory beanFactory, Properties props) throws BeansException { super .processProperties(beanFactory, props); } }
BeanPostProcessor
org.springframework.beans.factory.config.BeanPostProcessor
BeanPostProcessor 接口定义了两个基本的Bean初始化回调方法,在属性赋值前后执行。
postProcessBeforeInitialization:在 Bean 初始化方法(如 @PostConstruct、InitializingBean.afterPropertiesSet 或自定义初始化方法)调用之前执行;返回的对象将是实际注入到容器中的 Bean,如果返回 null,则该 Bean 不会被注册。可用于创建代理类postProcessAfterInitialization:初始化bean之后,返回的对象将是实际注入到容器中的 Bean,如果返回 null,则该 Bean 不会被注册。
5.InstantiationAwareBeanPostProcessor
org.springframework.beans.factory.config.InstantiationAwareBeanPostProcessor
该接口继承了BeanPostProcess接口,区别如下:
BeanPostProcess接口只在bean的初始化阶段进行扩展(注入spring上下文前后),而InstantiationAwareBeanPostProcessor接口在此基础上增加了3个方法,把可扩展的范围增加了实例化阶段和属性注入阶段。
该类主要的扩展点有以下几个方法,主要在bean生命周期的两大阶段:实例化阶段 和初始化阶段 ,下面一起进行说明,按调用顺序为:
postProcessBeforeInstantiation:实例化bean之前,相当于new这个bean之前postProcessAfterInstantiation:实例化bean之后,相当于new这个bean之后postProcessPropertyValues:(方法在spring5.1版本后就已弃用),bean已经实例化完成,在属性注入时阶段触发,@Autowired,@Resource等注解原理基于此方法实现;可以修改Bean的属性值或进行其他自定义操作,当postProcessAfterInstantiation返回true才执行。 postProcessBeforeInitialization:初始化bean之前,相当于把bean注入spring上下文之前;可用于创建代理类,如果返回的不是 null(也就是返回的是一个代理类) ,那么后续只会调用 postProcessAfterInitialization() 方法postProcessAfterInitialization:初始化bean之后,相当于把bean注入spring上下文之后;返回值会影响 postProcessProperties() 是否执行,其中返回 false 的话,是不会执行。postProcessProperties():在 Bean 设置属性前调用;用于修改 bean 的属性,如果返回值不为空,那么会更改指定字段的值
使用场景:这个扩展点非常有用 ,无论是写中间件和业务中,都能利用这个特性。比如对实现了某一类接口的bean在各个生命期间进行收集,或者对某个类型的bean进行统一的设值等等。
扩展方式为:
1
2
3
4
5
6
7
8
9
10
11
12
13
14
15
16
17
18
19
20
21
22
23
24
25
26
27
28
29
30
31
public class TestInstantiationAwareBeanPostProcessor implements InstantiationAwareBeanPostProcessor { @Override public Object postProcessBeforeInitialization (Object bean, String beanName) throws BeansException { System.out.println("[TestInstantiationAwareBeanPostProcessor] before initialization " + beanName); return bean; } @Override public Object postProcessAfterInitialization (Object bean, String beanName) throws BeansException { System.out.println("[TestInstantiationAwareBeanPostProcessor] after initialization " + beanName); return bean; } @Override public Object postProcessBeforeInstantiation (Class<?> beanClass, String beanName) throws BeansException { System.out.println("[TestInstantiationAwareBeanPostProcessor] before instantiation " + beanName); return null ; } @Override public boolean postProcessAfterInstantiation (Object bean, String beanName) throws BeansException { System.out.println("[TestInstantiationAwareBeanPostProcessor] after instantiation " + beanName); return true ; } @Override public PropertyValues postProcessPropertyValues (PropertyValues pvs, PropertyDescriptor[] pds, Object bean, String beanName) throws BeansException { System.out.println("[TestInstantiationAwareBeanPostProcessor] postProcessPropertyValues " + beanName); return pvs; }
6.SmartInstantiationAwareBeanPostProcessor
org.springframework.beans.factory.config.SmartInstantiationAwareBeanPostProcessor
该扩展接口有3个触发点方法:
predictBeanType:该触发点发生在postProcessBeforeInstantiation之前(在图上并没有标明,因为一般不太需要扩展这个点),这个方法用于预测Bean的类型,返回第一个预测成功的Class类型,如果不能预测返回null;当你调用BeanFactory.getType(name)时当通过bean的名字无法得到bean类型信息时就调用该回调方法来决定类型信息。determineCandidateConstructors:该触发点发生在postProcessBeforeInstantiation之后,用于确定该bean的构造函数之用,返回的是该bean的所有构造函数列表。用户可以扩展这个点,来自定义选择相应的构造器来实例化这个bean。getEarlyBeanReference:该触发点发生在postProcessAfterInstantiation之后,当有循环依赖的场景,当bean实例化好之后,为了防止有循环依赖,会提前暴露回调方法,用于bean实例化的后置处理。这个方法就是在提前暴露的回调方法中触发。
扩展方式为:
1
2
3
4
5
6
7
8
9
10
11
12
13
14
15
16
17
18
19
20
public class TestSmartInstantiationAwareBeanPostProcessor implements SmartInstantiationAwareBeanPostProcessor { @Override public Class<?> predictBeanType(Class<?> beanClass, String beanName) throws BeansException { System.out.println("[TestSmartInstantiationAwareBeanPostProcessor] predictBeanType " + beanName); return beanClass; } @Override public Constructor<?>[] determineCandidateConstructors(Class<?> beanClass, String beanName) throws BeansException { System.out.println("[TestSmartInstantiationAwareBeanPostProcessor] determineCandidateConstructors " + beanName); return null ; } @Override public Object getEarlyBeanReference (Object bean, String beanName) throws BeansException { System.out.println("[TestSmartInstantiationAwareBeanPostProcessor] getEarlyBeanReference " + beanName); return bean; } }
7.BeanFactoryAware
org.springframework.beans.factory.BeanFactoryAware
这个类只有一个触发点,发生在bean的实例化之后,注入属性之前,也就是Setter之前。这个类的扩展点方法为setBeanFactory,可以拿到BeanFactory这个属性。
使用场景为,你可以在bean实例化之后,但还未初始化之前,拿到 BeanFactory,在这个时候,可以对每个bean作特殊化的定制。也或者可以把BeanFactory拿到进行缓存,日后使用。
扩展方式为:
1
2
3
4
5
6
public class TestBeanFactoryAware implements BeanFactoryAware { @Override public void setBeanFactory (BeanFactory beanFactory) throws BeansException { System.out.println("[TestBeanFactoryAware] " + beanFactory.getBean(TestBeanFactoryAware.class).getClass().getSimpleName()); } }
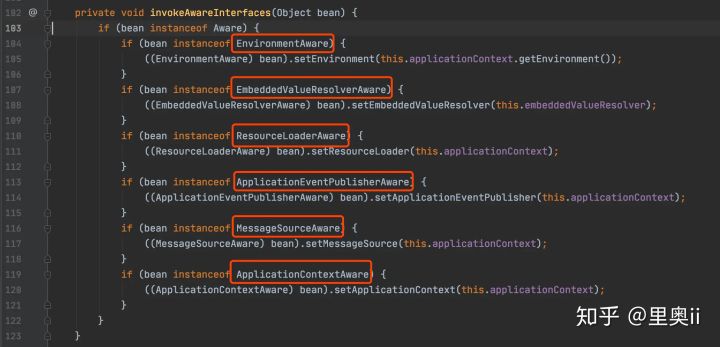
8.ApplicationContextAwareProcessor
org.springframework.context.support.ApplicationContextAwareProcessor
该类本身并没有扩展点,但是该类内部却有6个扩展点可供实现 ,这些类触发的时机在bean实例化之后,初始化之前
可以看到,该类用于执行各种驱动接口,在bean实例化之后,属性填充之后,通过执行以上红框标出的扩展接口,来获取对应容器的变量。所以这里应该来说是有6个扩展点 ,这里就放一起来说了
EnvironmentAware:用于获取EnviromentAware的一个扩展类,这个变量非常有用, 可以获得系统内的所有参数。当然个人认为这个Aware没必要去扩展,因为spring内部都可以通过注入的方式来直接获得。EmbeddedValueResolverAware:用于获取StringValueResolver的一个扩展类, StringValueResolver用于获取基于String类型的properties的变量,一般我们都用@Value的方式去获取,如果实现了这个Aware接口,把StringValueResolver缓存起来,通过这个类去获取String类型的变量,效果是一样的。ResourceLoaderAware:用于获取ResourceLoader的一个扩展类,ResourceLoader可以用于获取classpath内所有的资源对象,可以扩展此类来拿到ResourceLoader对象。ApplicationEventPublisherAware:用于获取ApplicationEventPublisher的一个扩展类,ApplicationEventPublisher可以用来发布事件,结合ApplicationListener来共同使用,下文在介绍ApplicationListener时会详细提到。这个对象也可以通过spring注入的方式来获得。MessageSourceAware:用于获取MessageSource的一个扩展类,MessageSource主要用来做国际化。ApplicationContextAware:用来获取ApplicationContext的一个扩展类,ApplicationContext应该是很多人非常熟悉的一个类了,就是spring上下文管理器,可以手动的获取任何在spring上下文注册的bean,我们经常扩展这个接口来缓存spring上下文,包装成静态方法。同时ApplicationContext也实现了BeanFactory,MessageSource,ApplicationEventPublisher等接口,也可以用来做相关接口的事情。
9.BeanNameAware
org.springframework.beans.factory.BeanNameAware
可以看到,这个类也是Aware扩展的一种,触发点在bean的初始化之前,也就是postProcessBeforeInitialization之前,这个类的触发点方法只有一个:setBeanName
使用场景为:用户可以扩展这个点,在初始化bean之前拿到spring容器中注册的的beanName,来自行修改这个beanName的值。
扩展方式为:
1
2
3
4
5
6
7
8
9
10
public class NormalBeanA implements BeanNameAware { public NormalBeanA () { System.out.println("NormalBean constructor" ); } @Override public void setBeanName (String name) { System.out.println("[BeanNameAware] " + name); } }
10.@PostConstruct
javax.annotation.PostConstruct
这个并不算一个扩展点,其实就是一个标注。其作用是在bean的初始化阶段,如果对一个方法标注了@PostConstruct,会先调用这个方法。这里重点是要关注下这个标准的触发点,这个触发点是在postProcessBeforeInitialization之后,InitializingBean.afterPropertiesSet之前。
使用场景:用户可以对某一方法进行标注,来进行初始化某一个属性
扩展方式为:
1
2
3
4
5
6
7
8
9
10
public class NormalBeanA { public NormalBeanA () { System.out.println("NormalBean constructor" ); } @PostConstruct public void init () { System.out.println("[PostConstruct] NormalBeanA" ); } }
11.InitializingBean
org.springframework.beans.factory.InitializingBean
这个类,是用来初始化bean的。InitializingBean接口为bean提供了初始化方法的方式,它只包括afterPropertiesSet方法,凡是继承该接口的类,在初始化bean的时候都会执行该方法。这个扩展点的触发时机在postProcessAfterInitialization之前。
使用场景:用户实现此接口,来进行系统启动的时候一些业务指标的初始化工作。
扩展方式为:
1
2
3
4
5
6
public class NormalBeanA implements InitializingBean { @Override public void afterPropertiesSet () throws Exception { System.out.println("[InitializingBean] NormalBeanA" ); } }
12.FactoryBean
org.springframework.beans.factory.FactoryBean
一般情况下,Spring通过反射机制利用bean的class属性指定支线类去实例化bean,在某些情况下,实例化Bean过程比较复杂,如果按照传统的方式,则需要在bean中提供大量的配置信息。配置方式的灵活性是受限的,这时采用编码的方式可能会得到一个简单的方案。Spring为此提供了一个org.springframework.bean.factory.FactoryBean的工厂类接口,用户可以通过实现该接口定制实例化Bean的逻辑。FactoryBean接口对于Spring框架来说占用重要的地位,Spring自身就提供了70多个FactoryBean的实现。它们隐藏了实例化一些复杂bean的细节,给上层应用带来了便利。从Spring3.0开始,FactoryBean开始支持泛型,即接口声明改为FactoryBean<T>的形式
使用场景:用户可以扩展这个类,来为要实例化的bean作一个代理,比如为该对象的所有的方法作一个拦截,在调用前后输出一行log,模仿ProxyFactoryBean的功能。
扩展方式为:
1
2
3
4
5
6
7
8
9
10
11
12
13
14
15
16
17
18
19
20
21
22
public class TestFactoryBean implements FactoryBean <TestFactoryBean.TestFactoryInnerBean> { @Override public TestFactoryBean.TestFactoryInnerBean getObject () throws Exception { System.out.println("[FactoryBean] getObject" ); return new TestFactoryBean .TestFactoryInnerBean(); } @Override public Class<?> getObjectType() { return TestFactoryBean.TestFactoryInnerBean.class; } @Override public boolean isSingleton () { return true ; } public static class TestFactoryInnerBean { } }
13.SmartInitializingSingleton
org.springframework.beans.factory.SmartInitializingSingleton
这个接口中只有一个方法afterSingletonsInstantiated,其作用是是 在spring容器管理的所有单例对象(非懒加载对象)初始化完成之后调用的回调接口。其触发时机为postProcessAfterInitialization之后。
使用场景:用户可以扩展此接口在对所有单例对象初始化完毕后,做一些后置的业务处理。
扩展方式为:
1
2
3
4
5
6
public class TestSmartInitializingSingleton implements SmartInitializingSingleton { @Override public void afterSingletonsInstantiated () { System.out.println("[TestSmartInitializingSingleton]" ); } }
14.CommandLineRunner和ApplicationRunner
org.springframework.boot.CommandLineRunner
这两个是Springboot中新增的扩展点,之所以将这两个扩展点放在一起,是因为它两个功能特性高度相似,不同的只是名字、扩展方法形参数类型、执行先后的一些小的不同。
这两个接口触发时机为整个项目启动完毕后,自动执行。如果有多个CommandLineRunner,可以利用@Order来进行排序。
注意:
CommandLineRunner和ApplicationRunner都有一个扩展方法run(),但是run()形参数类型不同;
CommandLineRunner.run()方法的形参数类型是String… args,ApplicationRunner.run()的形参数类型是ApplicationArguments args;
CommandLineRunner.run()的执行时机要晚于ApplicationRunner.run()一点;
CommandLineRunner和ApplicationRunner触发执行时机是在Spring容器、Tomcat容器正式启动完成后,可以正式处理业务请求前,即项目启动的最后一步;
CommandLineRunner和ApplicationRunner可以应用的场景:项目启动前,热点数据的预加载、清除临时文件、读取自定义配置信息等;
使用场景
初始化数据:使用 CommandLineRunner 可以在应用启动后初始化一些必要的数据,例如从数据库加载某些配置或插入初始数据。
1
2
3
4
5
6
7
8
9
10
11
12
13
14
@Component public class DataInitializer implements CommandLineRunner { @Override public void run(String... args) { System.out.println("初始化数据:插入初始数据"); // 模拟插入初始数据 insertInitialData(); } private void insertInitialData() { System.out.println("插入数据:用户表初始数据"); } }
启动后执行任务:使用 CommandLineRunner 可以在应用启动后执行一些特定的任务,比如发送一个通知或启动一些背景任务。
1
2
3
4
5
6
7
8
9
10
11
12
13
14
@Component public class TaskExecutor implements CommandLineRunner { @Override public void run(String... args) { System.out.println("启动后执行任务:发送启动通知"); // 模拟发送启动通知 sendStartupNotification(); } private void sendStartupNotification() { System.out.println("通知:应用已启动"); } }
读取命令行参数:使用 CommandLineRunner 可以获取并处理命令行参数,这对于需要根据启动参数动态配置应用的场景非常有用。
1
2
3
4
5
6
7
8
9
10
11
12
13
14
15
16
17
18
@Component public class CommandLineArgsProcessor implements CommandLineRunner { @Override public void run(String... args) { System.out.println("处理命令行参数:"); for (String arg : args) { System.out.println("参数:" + arg); } } } @SpringBootApplication public class AppConfig { public static void main(String[] args) { SpringApplication.run(AppConfig.class, new String[]{"参数1", "参数2", "参数3"}); } }
15.DisposableBean
org.springframework.beans.factory.DisposableBean
这个扩展点也只有一个方法:destroy(),其触发时机为当此对象销毁时,会自动执行这个方法。比如说运行applicationContext.registerShutdownHook时,就会触发这个方法。
扩展方式为:
1
2
3
4
5
6
public class NormalBeanA implements DisposableBean { @Override public void destroy () throws Exception { System.out.println("[DisposableBean] NormalBeanA" ); } }
16.ApplicationListener
org.springframework.context.ApplicationListener
准确的说,这个应该不算spring&springboot当中的一个扩展点,ApplicationListener可以监听某个事件的event,触发时机可以穿插在业务方法执行过程中,用户可以自定义某个业务事件。但是spring内部也有一些内置事件,这种事件,可以穿插在启动调用中。我们也可以利用这个特性,来自己做一些内置事件的监听器来达到和前面一些触发点大致相同的事情。
接下来罗列下spring主要的内置事件:
ContextRefreshedEventConfigurableApplicationContext接口中使用 refresh()方法来发生。此处的初始化是指:所有的Bean被成功装载,后处理Bean被检测并激活,所有Singleton Bean 被预实例化,ApplicationContext容器已就绪可用。
ContextStartedEventConfigurableApplicationContext (ApplicationContext子接口)接口中的 start() 方法启动 ApplicationContext时,该事件被发布。你可以调查你的数据库,或者你可以在接受到这个事件后重启任何停止的应用程序。
ContextStoppedEventConfigurableApplicationContext接口中的 stop()停止ApplicationContext时,发布这个事件。你可以在接受到这个事件后做必要的清理的工作
ContextClosedEventConfigurableApplicationContext接口中的 close()方法关闭 ApplicationContext 时,该事件被发布。一个已关闭的上下文到达生命周期末端;它不能被刷新或重启
RequestHandledEvent
BeanClassLoaderAware
org.springframework.beans.factory.BeanClassLoaderAware
介绍 用于让一个 Bean 获取到加载它的 ClassLoader。实现这个接口的 Bean 会在其属性设置完成后、初始化方法调用之前被注入 ClassLoader。该接口定义了一个方法:
void setBeanClassLoader(ClassLoader classLoader):在某些需要动态加载类的场景中,获取 ClassLoader 是非常有用的。
使用场景
动态加载类:有时候,我们可能需要在运行时动态加载类,利用 BeanClassLoaderAware 可以方便地获取到 ClassLoader 来实现这一需求。
1
2
3
4
5
6
7
8
9
10
11
12
13
14
15
16
17
18
19
20
21
22
23
24
25
26
27
28
29
30
@Component public class DynamicClassLoader implements BeanClassLoaderAware { private ClassLoader classLoader; @Override public void setBeanClassLoader(ClassLoader classLoader) { this.classLoader = classLoader; System.out.println("已设置类加载器"); } public void loadClass(String className) { try { Class<?> clazz = classLoader.loadClass(className); System.out.println("已加载类:" + clazz.getName()); } catch (ClassNotFoundException e) { System.out.println("类未找到:" + className); } } } @SpringBootApplication public class AppConfig { public static void main(String[] args) { ConfigurableApplicationContext context = SpringApplication.run(AppConfig.class, args); DynamicClassLoader dynamicClassLoader = context.getBean(DynamicClassLoader.class); dynamicClassLoader.loadClass("java.util.ArrayList"); dynamicClassLoader.loadClass("不存在的类"); } }
检查类的可用性:在某些情况下,我们可能需要检查某个类是否在当前的类路径中可用。利用 BeanClassLoaderAware 可以方便地实现这一需求。
1
2
3
4
5
6
7
8
9
10
11
12
13
14
15
16
17
18
19
20
21
22
23
24
25
26
27
28
29
30
31
32
@Component public class ClassAvailabilityChecker implements BeanClassLoaderAware { private ClassLoader classLoader; @Override public void setBeanClassLoader(ClassLoader classLoader) { this.classLoader = classLoader; System.out.println("已设置类加载器"); } public boolean isClassAvailable(String className) { try { Class<?> clazz = classLoader.loadClass(className); System.out.println("类可用:" + clazz.getName()); return true; } catch (ClassNotFoundException e) { System.out.println("类不可用:" + className); return false; } } } @SpringBootApplication public class AppConfig { public static void main(String[] args) { ConfigurableApplicationContext context = SpringApplication.run(AppConfig.class, args); ClassAvailabilityChecker checker = context.getBean(ClassAvailabilityChecker.class); checker.isClassAvailable("java.util.HashMap"); checker.isClassAvailable("不存在的类"); } }
加载资源文件:通过 BeanClassLoaderAware 获取的 ClassLoader,我们还可以方便地加载资源文件。
1
2
3
4
5
6
7
8
9
10
11
12
13
14
15
16
17
18
19
20
21
22
23
24
25
26
27
28
29
30
@Component public class ResourceLoader implements BeanClassLoaderAware { private ClassLoader classLoader; @Override public void setBeanClassLoader(ClassLoader classLoader) { this.classLoader = classLoader; System.out.println("已设置类加载器"); } public void loadResource(String resourcePath) { InputStream inputStream = classLoader.getResourceAsStream(resourcePath); if (inputStream != null) { System.out.println("资源已加载:" + resourcePath); } else { System.out.println("资源未找到:" + resourcePath); } } } @SpringBootApplication public class AppConfig { public static void main(String[] args) { ConfigurableApplicationContext context = SpringApplication.run(AppConfig.class, args); ResourceLoader resourceLoader = context.getBean(ResourceLoader.class); resourceLoader.loadResource("application.properties"); resourceLoader.loadResource("不存在的资源"); } }
BeanFactoryAware
org.springframework.beans.factory.BeanFactoryAware
介绍 这个类只有一个触发点,发生在bean的实例化之后,注入属性之前,也就是Setter之前。这个类的扩展点方法为setBeanFactory,可以拿到BeanFactory这个属性,从而能够进行更复杂的 Bean 操作。例如,动态获取其他 Bean、检查 Bean 的状态等。
使用场景
动态获取其他 Bean:通过实现 BeanFactoryAware 接口,一个 Bean 可以在运行时动态获取其他 Bean。这在一些需要解耦的场景下非常有用。
1
2
3
4
5
6
7
8
9
10
11
12
13
14
15
16
17
18
19
20
21
22
23
24
25
26
27
28
29
30
31
32
33
34
@Component public class DynamicBeanFetcher implements BeanFactoryAware { private BeanFactory beanFactory; @Override public void setBeanFactory(BeanFactory beanFactory) throws BeansException { this.beanFactory = beanFactory; System.out.println("注入 BeanFactory 实例"); } public void fetchAndUseBean() { MyBean myBean = beanFactory.getBean(MyBean.class); System.out.println("获取到的 Bean 实例: " + myBean); } } @Component public class MyBean { @Override public String toString() { return "这是 MyBean 实例"; } } @Configuration @ComponentScan(basePackages = "com.seven") public class AppConfig { public static void main(String[] args) { ApplicationContext context = new AnnotationConfigApplicationContext(AppConfig.class); DynamicBeanFetcher fetcher = context.getBean(DynamicBeanFetcher.class); fetcher.fetchAndUseBean(); } }
检查 Bean 的状态:通过 BeanFactoryAware,可以在运行时检查某个 Bean 是否存在或者其状态,这对一些需要动态检查 Bean 状态的场景非常有用。
1
2
3
4
5
6
7
8
9
10
11
12
13
14
15
16
17
18
19
20
21
22
23
24
25
26
27
28
29
30
31
32
33
34
@Component public class BeanStateChecker implements BeanFactoryAware { private BeanFactory beanFactory; @Override public void setBeanFactory(BeanFactory beanFactory) throws BeansException { this.beanFactory = beanFactory; System.out.println("注入 BeanFactory 实例"); } public void checkBeanState() { boolean exists = beanFactory.containsBean("myBean"); System.out.println("MyBean 是否存在: " + exists); } } @Component("myBean") public class MyBean { @Override public String toString() { return "这是 MyBean 实例"; } } @Configuration @ComponentScan(basePackages = "com.seven") public class AppConfig { public static void main(String[] args) { ApplicationContext context = new AnnotationConfigApplicationContext(AppConfig.class); BeanStateChecker checker = context.getBean(BeanStateChecker.class); checker.checkBeanState(); } }
创建复杂 Bean 的初始化逻辑:在一些复杂的业务场景中,有时需要在 Bean 初始化时执行一些复杂的逻辑,例如动态创建其他 Bean 并注入到当前 Bean 中。通过 BeanFactoryAware 可以实现这一点。
1
2
3
4
5
6
7
8
9
10
11
12
13
14
15
16
17
18
19
20
21
22
23
24
25
26
27
28
29
30
31
32
33
34
35
@Component public class ComplexBeanInitializer implements BeanFactoryAware { private BeanFactory beanFactory; @Override public void setBeanFactory(BeanFactory beanFactory) throws BeansException { this.beanFactory = beanFactory; System.out.println("注入 BeanFactory 实例"); } public void initializeComplexBean() { MyBean myBean = beanFactory.getBean(MyBean.class); System.out.println("初始化复杂 Bean, 获取到的 MyBean 实例: " + myBean); // 在这里可以执行复杂的初始化逻辑 } } @Component public class MyBean { @Override public String toString() { return "这是 MyBean 实例"; } } @Configuration @ComponentScan(basePackages = "com.seven") public class AppConfig { public static void main(String[] args) { ApplicationContext context = new AnnotationConfigApplicationContext(AppConfig.class); ComplexBeanInitializer initializer = context.getBean(ComplexBeanInitializer.class); initializer.initializeComplexBean(); } }
https://mp.weixin.qq.com/s/O0W6vCuqQfeAH0UB7elpeA